Labels

Chocolate Cupcake, Blog Hop, and Fabulous Blog Hop Candy


    Wow, what a great Monday morning! 


    First - it is the monthly BBTB2 Design Team Blog Hop!  That means you probably arrived here from BBTB2.  The featured cut this week is one of the cupcakes from the Celebrations cartridge.  I cut my cupcake in chocolate brown paper with pink frosting and gem flower sprinkles.  I then added a birthday hat, a scalloped card front and a Happy Birthday tag made with Stampin' Up stamps and Spellbinders oval nesties to create this girly birthday card.  I topped the birthday hat off with a lovely prima flower and a larger gem flower and trimmed both the hat and the cupcake wrapper with Making Memories ribbon


    In addition to the blog hop, we have a lot going on at BBTB2.  BBTB2 has a blog hop give away which is being sponsored by Everyday Cricut (formerly known as Holiday with the Cricut).  You can win the Sweethearts cartridge and package of SEI (Happy Day) scrap paper.  All you have to do to be eligible to win is leave a comment on BBTB2 blog AND sign up to follow the BBTB2 blog.  How easy is that?


    I too have a fabulous blog hop give away/blog candy.  Custom Crops is sponsoring me this week with a $25.00 gift voucher for their store.  Just leave a comment below and I will select a winner for the gift voucher on Thursday, March 4th.  Thank you so much Custom Crops for sponsoring my prize this month!


    After you leave your comment below you (because YOU KNOW you want the $25.00 gift voucher) you will continue on the BBTB2 design team blog hop.  Your next stop is at Lori's blog.  Lori is a very talented designer and I know you are going to love what she has made to share.  Happy Hopping!!

    Source URL: http://soniceview.blogspot.com/2010/02/
    Visit So Nice View for daily updated images of art collection

Hop for Joy! A new Magnolia-licious DT sketch challenge

    Good morning and happy March 1st....the month that has the first day of spring! YAY! LOL! We have a new DT sketch challenge for you from Magnolia-licious. This month, it's Jacque's turn to choose the challenge and she provided us with an awesome sketch! I wanted to use this adorable Tilda in a bunny suit that I got from Magnolia-licious. And true to my record, I have used yet another stamp that is not in stock in the store. UGH! I'm so sorry. But if you're interested, please be sure and email Diana. I also used #427 flowers from Lazy Summer Days collection. Both are colored with Copic markers and Tilda is cut out and popped up for dimension.

    The fun and punny sentiment is from a set of Easter Greetings at The Cutting Cafe' called Happy Easter Inside and Out Greetings. The butterflies are cut using my Cricut, and I added a Prima rose I got from Stamp and Create and some cherry blossoms I got from Wild Orchid Crafts. Please be sure and visit Magnolia-licious Highlites to see the gorgeous cards the rest of my design team sisters have created. They are all so fabulously talented. And we're excited that we've got two new guest designers joining us as well! So a huge welcome to Mindy and Angela!

    That's it for today! Thanks so much for stopping by to see me today, and hope to see you back again soon! Hugs!!
    Card recipe:
    images - Magnolia from Magnolia-licious, sentiment from The Cutting Cafe'
    Paper: DP - Basic Grey Two Scoops; cardstock - Bazzill; stamped images on cryogen white
    ink: Memento Tuxedo Black; Copic Sketch markers
    Tools: Cricut with Tear Drop cart for butterlfies, MS frond and branch punches, Round and scalloped round Nestabilities
    Misc: ribbon from Stamp and Create, Kaiser half backed pearls, dimensional tape, stickles
    Source URL: http://soniceview.blogspot.com/2010/02/
    Visit So Nice View for daily updated images of art collection

Flavor-of-the-Month . . . Chocolate Raspberry Truffles


    Until I was in my 20's, I'd never eaten a truffle. Sure, I'd had chocolate from the box of Russell Stover's, but truffles, no.


    Enter my brilliant Aunt Janice who treated me to my first truffle, a Chocolate Raspberry Truffle, at Godiva on a visit to New York City. It was pure heaven...the crisp outer shell, the dark, rich center, the slight tang of raspberry. I believe there were angels singing.

    Since I had this raspberry sauce on hand, I decided to try making them myself. You know what? They are pretty delicious.


    Chocolate Raspberry Truffles

    8 oz. bittersweet chocolate
    1/2 c. heavy cream
    2 TBSP raspberry sauce
    1 bag dark chocolate candy melts
    sanding sugar (optional)


    Chop the chocolate and place in a bowl. Bring the cream to a simmer on the stove and pour over the chocolate.


    Let sit 5 minutes, then whisk until smooth. Stir in the raspberry sauce.

    Let this mixture sit at room temperature for an hour or more until set. (I poured it into a shallow baking dish to help cool it down faster.)


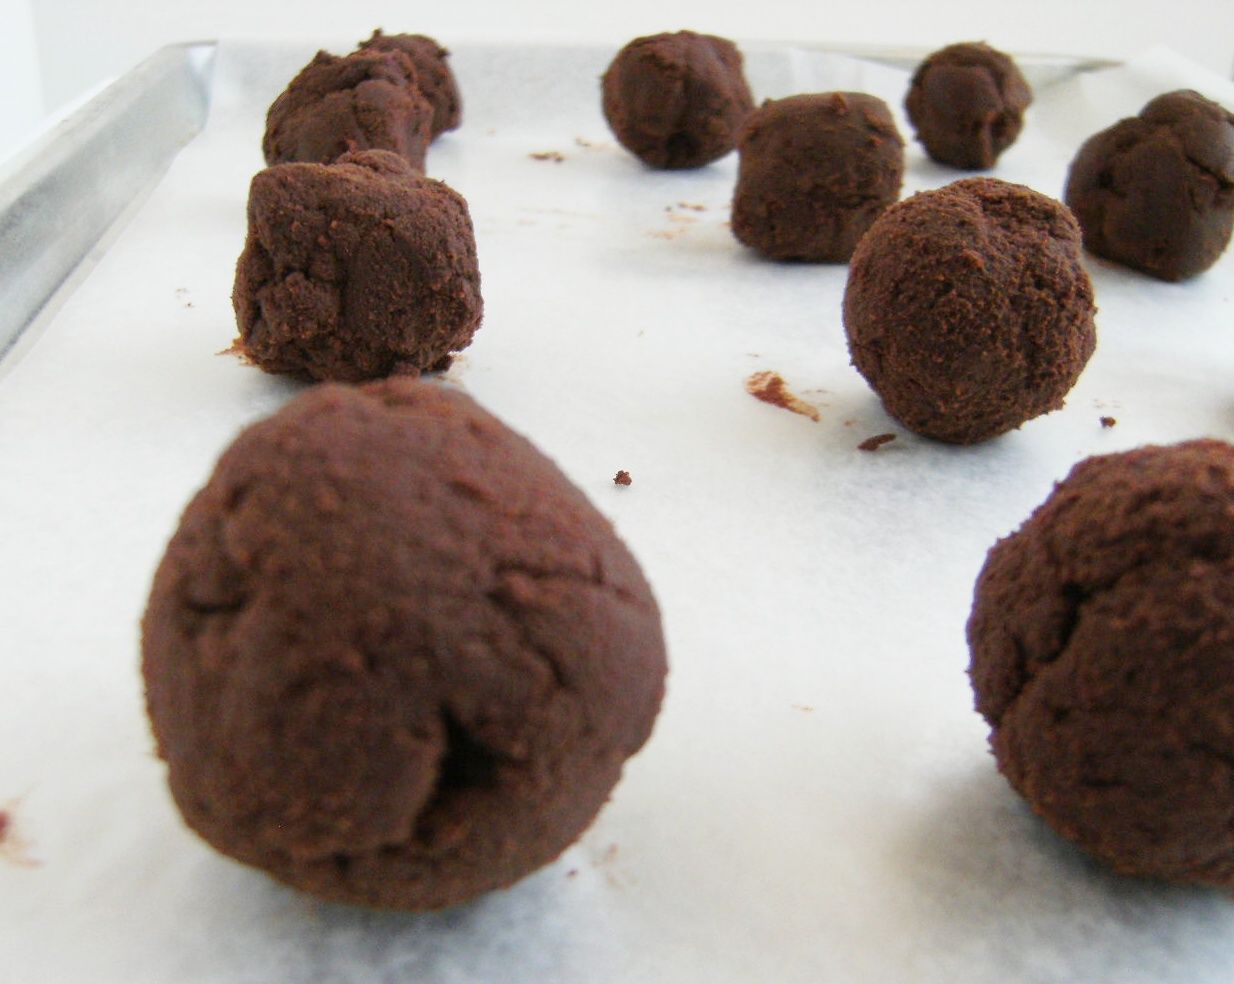
    Scoop into balls using a melon baller or a spoon and place on a cookie sheet lined with wax paper. (I watched Ina do this on TV and get perfectly round ball....that didn't happen for me. I got this: )

    {not pretty.}

    If that happens to you, pop them in the fridge, then remove after 15 minutes and shape into balls. (I had better luck pressing them together, rather than rolling them.)

    {much better. }

    Refrigerate the truffles until ready to coat.

    (You can skip the next step entirely and roll the truffles in cocoa powder, or...)

    In the microwave, melt the candy melts with 1 tsp shortening. Melt in 30 second intervals on 50% power, stirring after every cycle until melted.

    Dip the truffles into the candy melts and place on the wax paper lined sheet. While the candy melts are still wet, sprinkle with sanding sugar.


    Now, I know it is like a sacrilege to use candy melts to coat real chocolate, but I wanted that hard outer shell and haven't been brave enough to try my hand at tempering chocolate. Anyone tried it?


    Do you have a chocolate post to link up? I can't wait to see! Link up a the the bottom of the post. Please remember to link to your POST, not the main page of you blog.

    Thanks so much for playing along with Flavor-of-the-Month. I've heard from several of you that FOTM sneaks up on you and sends you into a mad panic at the end of each month. You know what, it does to me too, most months. I always meant it to be *fun* not stressful, SOOOOO...this is the last Flavor-of-the-Month. (I think chocolate is a good way to go out, don't you?)

    It will be replaced with impromptu linky parties now and again. I might say..."What's the best thing you've baked this month?" and ask you link up. I'll be sure to announce those on twitter, too, so if you're not there, come join the fun!

    Alright, ladies & gents....link away!!! {Linky will be open through March 2nd.}
    Source URL: http://soniceview.blogspot.com/2010/02/
    Visit So Nice View for daily updated images of art collection

♥ (HELP) which one a better foundation? ♥

    I almost ran out of make up foundation & getting a new one soon.
    but I wanna try something new~~ but still not sure what brand should I get?
    I have been using Liquid MAC Mineralize Satinfinish Foundation foreveeer now.
    I like them especially the yellow undertone color on me but I'm still not 100% perfectly satisfied with the results. :(

    I have tried Laura Mercier Silk Creme Foundation.
    But I HATE the color on me. It makes my face looks a bit pale & the pinkish undertone is deff not my favorite. :(
    I got them in Medium Ivory, it was probably either too fair or too dark for me.

    I have also try CLINIQUE Perfectly Real Makeup in True Beige but I also hate the color on me.
    It was again, either too fair or too dark for me. :(

    I'm looking for my holy grail foundation. 
    I have a very dry skin, I don't have many acnes so I don't really need a full coverage but I do have a bit pores & bit of imperfection this and there so I still want the medium coverage with a natural look.
    I'd love to get the luminous dewy flawless kind of result. 
    It's one of the most important standard for my HG foundation other than finding the perfect color.
    I also need to find a perfect color foundation, so far NC35 is the colosest to perfect I've ever got.
    I don't like the pinkish color undertone, I like yellow undertone better. But of course not too yellow.

    soooo please, anybody, help me to find my HG foundation??


    I've been thinking of getting any of this..


    Bobbi Brown Luminous Moisturizing Foundation
    I'm interested because the foundation supposedly gives a luminous glowing result & moisturize my skin in the same time. It also have the anti-aging formula. The color result suppose to look very natural or sheer coverage that won't makes my face looks 'cakey'.
    Should I get this??


    Chanel Pro Lumiere Foundation
    the 'holy grail' foundation for many people. but is it really worth it? 
    It's really expensive though, almost double price more than MAC! :(
    but if its really that good, I would buy them for the quality.
    this foundation promise to gives a 'dewy' result, that's why I'm interested in it.
    Should I get this??


    Make Up For Ever HD Foundation
    one the most popular foundation out there.
    should I get this??

    or if you have a more better suggestion. I'd love to know.
    thankssss~~ ^^

    love.love ♥♥
    Source URL: http://soniceview.blogspot.com/2010/02/
    Visit So Nice View for daily updated images of art collection

Out of Order for the Week


    I needed a big sign hanging on over my shoulders this week which read: "OUT OF ORDER".  No that is not a Robert's Rules of Order reference, but rather the state of my existance.  I had a rather unpleasant stomach virus.  I finally turned the corner yesterday and was feeling better, that is until dinner tonight.  I think I over estimated my ability to handle "real food". 

    I was on the BRAT diet for a few days, but last night I decided I could have a light meal.  The light meal went so well that I over reached tonight.  Now my stomach is not happy with me, nor I with it!


    I really am sharing so that you might understand where I have been this week.  I will return early, early Monday morning with my BBTB2 project, AND the blog hop, AND a nice sponsored prize.  So visit me again on Monday and in the meantime, try to avoid the germs that are floating about this winter!


    Not wanting to post an "empty" entry, I am sharing photographs of Sheldon Church Ruins (originally named "Church of Prince William's Parish"), a magical place in the southern part of the state, near the ocean.  The church was burned down twice and was not rebuilt the last time.  The first time it was burned by the British in the Revolutionary War; the second time it was burned by Gen. Sherman's forces as they marched though during the Civil War.  Such a beautiful place to have such a sad history.


    Source URL: http://soniceview.blogspot.com/2010/02/
    Visit So Nice View for daily updated images of art collection

April Showers bring May Flowers. Peggy Loves Vintage with The Cutting Cafe'

    Happy Saturday everyone! Hope you're having a wonderful weekend. We had a rainy day today, which is wonderful. I love rainy days. Now please understand that I also live Reno, which is high altitude desert. So we just don't get rainy days. We get good snowy days, but rain storms are far and few between. So when we get one, I love it. Ok, enough about the weather! :) Let's move on to this adorable duck and baby from Peggy Loves Vintage! This image is actually from the New Baby Volume 2 cd. Be sure and really look at the images on Peggy's CDs with an open mind. They can be used for so many different things. I cut the image from the front of a baby shower card, because I thought they'd make the most adorable card to celebrate Spring.

    I printed out two of the images because I wanted to pop up Mama Duck, baby duck, and the top part of the umbrella. I just used some dimensional tape to pop them up. Hopefully you can see the dimension a little better in the picture below. Please visit Peggy's blog too. She's got a couple great images she's giving away right now. Please be sure and leave her some love and let her know which image you like best. She'd also love it if you'd link up your project you made.
    I mounted this adorable duck and baby on a FABULOUS scalloped square from The Cutting Cafe'! I don't know if you've seen the new large scalloped square from Spellbinders, and I also know I don't have to tell you how spendy they are. You can get the Assorted Scalloped Set 1 file from The Cutting Cafe', which has quite a few different type of scallops on it, for a grand total of $5.99, and you can make it any size you want with the click of your mouse!!! Easy peasy! You can either use the wpc file to cut it out with a cutting machine, or you can use the pdf file and your scissors. I truly LOVE this file of scallops! I cut mine out with my Pazzle Inspiration which I got from Hallmark Scrapbook! Hallmark is one of my favorite stores to shop at on line. Jody and Brad are the most wonderful people! They have the best prices and service ever! I also used the Rain, Rain, Go Away file for the sentiment. Regina has been releasing lots of new files, so please be sure and check them out over at The Cutting Cafe'!!
    Thanks so much for stopping to see me today, and hope to see you back again soon! Hugs!


    Card Recipe:
    Image - Peggy Loves Vintage New Baby Volume 2 cd; Sentiment and scalloped frame - The Cutting Cafe'
    DP - DCWV Whimsy stack; cardstock - Bazzill
    Tools - Pazzle Inspiration, EK Success flower punch, Circle Nesatabilites for sentiment
    Misc: buttons - stash, silk ribbon, Kaiser half backed pearls, dimensional tape

    Source URL: http://soniceview.blogspot.com/2010/02/
    Visit So Nice View for daily updated images of art collection

Bertoia, oh Bertoia...

    The Bertoia Side Chair has been on my mind a lot lately; my friend and client has been enamored with this chair for a while, and as we have been planning for new chairs in her kitchen, naturally, we keep coming back to the Bertoia. I love the chair too for its modern classic appeal and chameleon-like ability to suit any environment where it is placed.


    Domino


    L: Canadian House & Home. R: Domino


    Style at Home
    I know this image has been all around the blogosphere as of late, but obviously with just cause; I can't begin to tell you how head-over-heels I am for this space!


    Domino


    Coastal Living via In(side) the Loop


    Meyer Davis Studio

    I'm not sure how it is already Friday again, and while my weekend will involve some work, I am hoping to find some time to unwind and I plan to enjoy the last few days of the Olympics too! Whatever you are up to this weekend, I hope you have a great one!
    Source URL: http://soniceview.blogspot.com/2010/02/
    Visit So Nice View for daily updated images of art collection

Wags 'n Whiskers - Free Style!!

    WooHoo!! Happy Friday!! It's time for a new Wags 'n Whiskers challenge, and this week the talented Inge said it's Freestyle week!! I have been just waiting to use this beautiful image of Ansley in prayer. Oh my goodness, she's so pretty! I just think she's amazing for so many things. A first Communion card, a "your in my thoughts and prayers" card, a Sympathy card, a Baptism card, and the list goes on and on. She's colored with Copic markers, cut out, and then popped up with dimensional tape.

    Please be sure and visit the Wags 'n Whiskers challenge blog to see the gorgeous creations the rest of the WnW Design Divas came up with! What a talented bunch of ladies! And then we'd love it if you'd join us in the challenge as well. Remember in order to win, you must use a Wags 'n Whiskers image! And if you don't have any yet, then what the heck are you waiting for! Thanks for stopping by to see me today and hope to see you back again soon! Hugs!!
    card recipe:
    paper - DP - Graphic 45; cardstock - Bazzill; stamped image on Cryogen White
    Tools - oval nestabilities, MS frond punch, Sewing Machine
    misc: silk ribbon, cross charm, Prima flowers, Wild Orchid Crafts brown roses, Stickles (Frosted Lace), dimensional tape
    Source URL: http://soniceview.blogspot.com/2010/02/
    Visit So Nice View for daily updated images of art collection

As promised . . . cheesecake


    How about a little somethin' to go with that raspberry sauce?

    How about Vanilla Bean Cheesecake with a Chocolate Cookie Crust? Oh, yeah.

    One really nice part about finally living in the same city as my sister is that when it's her birthday, I get part of the cake. {I mean, that's not the only reason I like having her here.}

    She wanted birthday cheesecake and I couldn't have been happier.

    Let's start with the crust.

    Chocolate Cookie Crust

    1 & 3/4 c. crushed chocolate wafers
    4 TBSP melted butter
    4 tsp. sugar
    1/8 tsp. coarse salt

    Combine all ingredients. Press into the bottom of a 9" springform pan. Bake at 350 for 10 minutes. Let cool completely.


    {I used (chocolate) Oreos...just the cookie part...for the wafers because, well, they're cheaper than chocolate wafers and I knew there would be extras. What you do with the creamy centers is your business.}


    Vanilla Bean Cheesecake
    {modified version of Classic Cheesecake from The King Arthur Flour Baking Companion}


    3 (8 oz) pkgs. cream cheese, room temp.
    1 & 1/2 c. sugar
    1/4 tsp. coarse salt
    4 eggs
    3 TBSP freshly squeezed lemon juice
    1 TBSP vanilla bean paste
    1 c. sour cream, full fat
    1/2 c. heavy cream

    Preheat the oven to 325.

    On low speed, beat the cream cheese until no lumps remain; scraping down the sides as needed. Add the sugar and salt and beat until combined. Add the eggs one at a time until the mixture is smooth before adding the next egg. Scrape the bottom of the bowl after each addition.

    Stir in the lemon juice, vanilla bean paste, sour cream and heavy cream until smooth.

    Pour onto the cooled crust and bake 50 minutes or so until the edges are set and the cheesecake is a light golden brown. The middle will still jiggle when the pan is shaken.

    Turn off the oven, crack the door and let the cheesecake cool in the oven for 1 hour. (This helps prevent cracking.) The center will finish setting in the oven.

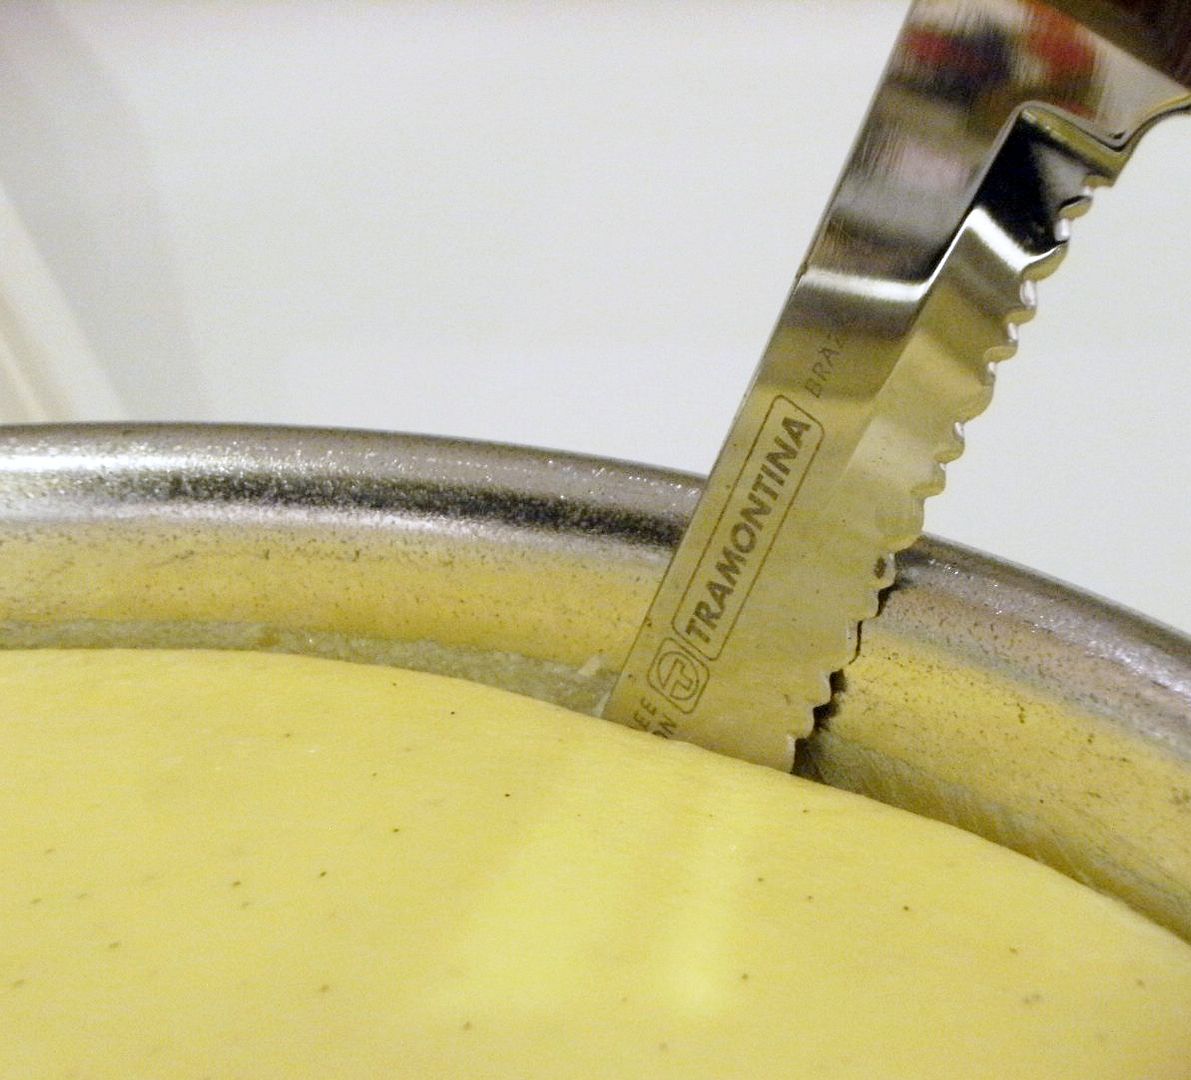
    After 1 hour, remove the cheesecake from the oven and run a knife around the edge of the pan.

    {Doing this allows the cheesecake to contract as it cools without pulling off the side and cracking.}


    Refrigerate overnight and serve with raspberry sauce (or plain, or with chocolate sauce).


    You might start spooning the raspberry sauce onto the cheesecake,


    but I say....go for the pour!

    Happy birthday to my beautiful sister, Molly! Thanks for sharing your cake with us! :)


    Related posts:
    {Oh...and Flavor-of-the-Month *Chocolate Edition* linky will be up on Sunday!}Source URL: http://soniceview.blogspot.com/2010/02/
    Visit So Nice View for daily updated images of art collection