Labels

Showing posts with label everyday. Show all posts

Easy as Pi . . . Happy Pi Day (3.14)!

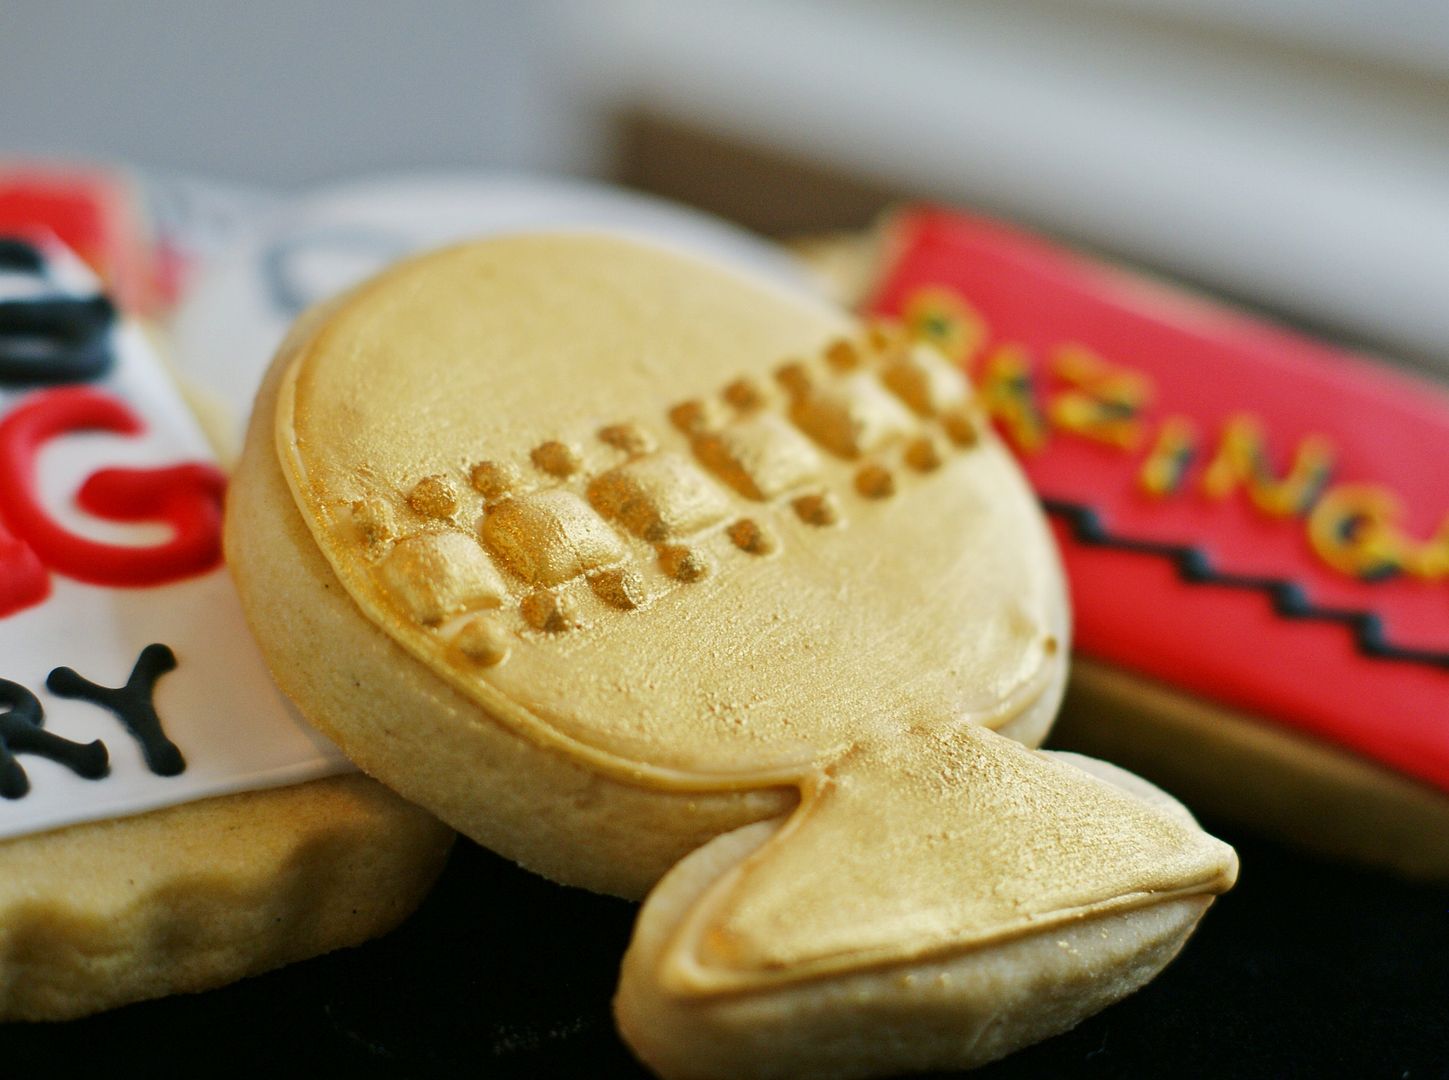
    Today is Pi Day!  You know, it's March 14th....3-14.  As in 3.14.....

    I might as well confess....we are a family of nerds.

    We like math.  There I said it.  Ok, I will draw the line at Trig and doing taxes, but working out math problems with pencil & paper?  I like it.

    {Kiddo is currently memorizing the numbers of Pi.  He is up to 41 places after the decimal.  Is there college scholarship for that? Because I'm pretty sure he can be up to digit 150 by 12th grade. ;)}

    I made these for kiddo's math teacher, so our nerdiness has been made public.  I think she knows, though, because kiddo owns this shirt and wears it on "free dress days" at school.

    Want to know where this awesomely cool Pi cookie cutter came from?  Copper Gifts.  You might need one.

    Happy Pi Day!  How will YOU celebrate? 
    Source URL: http://soniceview.blogspot.com/search/label/everyday
    Visit So Nice View for daily updated images of art collection

And the Golden Globe (cookie) Goes to . . .


    .....Jim Parsons (Sheldon) from The Big Bang Theory.

    Here's the story....a sweet girl, Lindsay, who I used to work with actually knows Jim.  Yep, I know people who know people. ;)

    Turns out that Jim went to the same high school I did although, I'm sure, MANY moons after I graduated.

    I've always said that nothing makes me more nervous than making a logo cookie, since I don't have one of those handy-dandy projectors.  Well, I've amended that....nothing makes me more nervous than making logo cookies for a Golden Globe WINNER.
     
    {You know what?  Everything looks better with a little ribbon....even a shaky logo.}


    Did you know that the Golden Globe award has a little "filmstrip" wrapped around it?  I didn't, either.  That's what those dots and squares are supposed to be. (I used a luster dust called Golden Charm here....I love the color!)


    Bazinga!  That's Sheldon's catchphrase.


    Congratulations on your Golden Globe, Jim!  You're doing Spring, Texas proud! :) 

    Source URL: http://soniceview.blogspot.com/search/label/everyday
    Visit So Nice View for daily updated images of art collection

More Tasty than a Chocolate Frog

    *Do you have the theme song in your head yet?*

    Last week, part one of the movie of the last Harry Potter book was released.

    We haven't seen it, yet, but I must tell you, we LOVE Harry Potter.  At first glance, it may seem a story of wizards, but at it's heart, it is a tale of the power of love, loyalty, bravery, sacrifice and friendship.
    Once I thought kiddo was old enough, we started reading them together.  Actually, *I* read them...aloud, all 4,100 pages of them (to be exact).  Snuggled on the couch, under a pile of afghans, Harry, Ron, Hermione, Hagrid and Dumbledore...they became a part of our lives.  Everyday we ended our reading with kiddo begging, "more, more!"
     
     
    We waited for the last book to be released and I sobbed though the entire thing.  Not only was I going to miss Harry, but I knew this had been precious time with kiddo.  Yes, there would be more books to read together,  but these were special.

    Want to make some Harry Potter cookies?  Here's what you'll need:
    With a #2 tip, outline the face in copper/flesh.

    Thin the flesh color with water until it is the consistency of thick syrup.  Let sit several minutes covered with a damp dish towel.

    Stir gently, transfer to a squeeze bottle and fill in the face.  Let sit a few hours.
    With a #2 tip, outline the hair in black.

     
    {Forgot to take pictures of a few of the steps here, but.....}

    Fill in the hair in black flood icing,
    pipe the glasses with a #1 tip,
    pipe the lightning bolt with a #1 tip in red.
    With the #1 tip, pipe a smile.

    I've said it before.....do NOT try to cheat and use a baggie instead of a piping bag.  I slipped a #1 tip in a baggie for the eyes....not wanting to waste a piping bag for a few eyes.  Yep, the bag exploded and broke Harry's glasses.  Not even a "Reparo" charm could help me.


    On the brooms, I tried a trick from Kudos Kitchen.  Painting on the wood grain.  Renee is a master of this; I'm still learning.  (You can see a video of her technique here.)
    {Broom cutter from Sweet!}

    Don't forget sweet Hedwig, Harry's snowy owl.

    Ron & Hermione sittin' in a tree....
    {JK Rowling...thanks for making Hermione a hero to "bushy-haired" girls everywhere!}


    A special shout-out to Diamonds for Dessert!  Her Harry Potter cookies were a MAJOR inspiration to me and the first Harry cookies I'd ever seen.  (Love that Snape!)Source URL: http://soniceview.blogspot.com/search/label/everyday
    Visit So Nice View for daily updated images of art collection

Cookies for I Heart Faces

    I'll admit that when Amy from I Heart Faces asked me to make some cookies for a photography workshop, I was a little, ok...a lot, intimidated.  The cookies were part of a stylized birthday party with some absolutely adorable little girls.
    savor photography (45 of 109) copy
    {These are not my pictures (obviously); they are from Rachel at Savor Photography.}
    savor photography (53 of 109) copy
    Amy found the inspiration for the flower cookie from this AMAZING blog from (I think) Japan, called Rosey. All of her cookies are incredible!  With that as a starting point, Amy came up with some designs for heart cookies to coordinate with them. 

    Want to make the flower cookies?
    You'll need royal icing in just two colors....Super Red and Super Black.

    Here's a little slide show tutorial....


    (Does this slide show look out of order to you guys? It's showing up out of order for me....I'll figure out how to fix it...I think. Sorry, I'm new to slide shows!)
     
    {While you have all of that red icing made, go ahead and make some little heart cookies. :)}

    To make the black hearts, you need only 2 things: black royal icing and silver dragees.  Well, and the secret weapon for placing dragees....tweezers. CLEAN tweezers! Place the dragees on the cookies while the icing is still wet.
    I don't know about you, but I remember EATING dragees when I was a kid.  I remember them on cupcakes and Christmas cookies.  Now, even though they are made of sugar and sold in the bakery section, they are marked "for decorative use only."  {I think a few now and then won't hurt us.}
    Let me give a few shout-outs here:
    Photography workshop: I Heart Faces
    I Heart Faces founders: Angie Arthur & Amy Locurto
    Coordinating Printables: Living Locurto
    Photos used here: Savor Photography
    More photos from the workshop: Angie Arthur
    Cookie inspiration: Rosey
    Thanks so much, Amy, for asking me to be a part of the workshop!  Next time, I want to tag along and bring my camera! :)
    Tidy Mom I'm Lovin It Fridays
    Source URL: http://soniceview.blogspot.com/search/label/everyday
    Visit So Nice View for daily updated images of art collection

Posie Cakes . . . cookies for a sip and see

    I had a request for my "signature cookie" this month.  The funny thing is, I didn't know I HAD a signature cookie, but I knew exactly which cookies she was referring to.  The pink cookies in my header, on my blog button, my twitter avatar....I must really like that cookie! ;)

    And because those original cookies were for my girlfriend Terri, it makes me happy to call them my "signature."

    This version of the cookie was for a sip and see for a baby girl.
     
    I love sip and sees!  Sip and Sees are like baby showers given AFTER the baby is born. There's ooo-ing and ahhh-ing over the baby, presents in pink or blue, lots of food....and oh, yeah...maybe the new mommy can have a mimosa! ;)

    To make the cookies, you'll need:
    First, outline the cookies with royal icing using a #3 tip.  Let the outline dry 20 minutes or more.

    Reserve some of the pink royal icing used for outlining and thin the rest with water for flooding.  Adding just a bit of water at a time, stir the water into the icing until it is the consistency of thick syrup or glue. Cover with a damp towel and let sit several minutes.

    Stir the icing gently with a rubber spatula to pop and air bubbles that have risen to the surface.  Transfer to squeeze bottles.

    Working 6-8 cookies at a time, fill in the outline in the contrasting pink thinned icing.  Use a toothpick to spread into edges and corners.

    Come back over the 6-8 cookies just flooded and drop on dots of the contrasting color.

    Let the cookies sit for more than an hour since the detail flowers are large.  You don't wanted dented icing! :)

    If you have made your royal icing the day you are decorating, add just a few drops of water to the outline consistency icing.  This will help prevent stiff peaks on your flowers.  If the icing was made the day before, it loses some of it's stiffness in the fridge. 

    With a #7 tip, add large dots for the flowers.

    With #1 tips, add swirly detail to the center of the flowers.

    With the green icing and a #1 tip, add leaves.

    Let dry overnight.

    Voila! 

    So, if these pink posie cookies are my "signature" cookies....what's YOUR signature dish? 

    Source URL: http://soniceview.blogspot.com/search/label/everyday
    Visit So Nice View for daily updated images of art collection